Thursday, July 16, 2015

New Ideas - Notecard Collage


I have challenged myself to create each day. 

And I like writing traditional letters (yes in script) to friends, especially during the summer when they are vacationing.

This year, prompted by the need for a wedding card for a couple of young artists, I made a greeting card. 

Of course I couldn't stop with just one, so I made a few more. 

These  are two examples, the bird is made using copyright-free images on a prepared card.


The tree is also a paper collage that has also been stenciled (my own design). 


Wednesday, June 17, 2015

Work in Progress Wednesday - Stitches and Knits


STITCHES                                      If you visit my studio you will see the scraps I keep. I love recycling and cannot bear to discard good lengths of fabric. The leftovers of strips of 2", 2 1/2" and 3" wide are kept in bins on a shelf. I sew smaller pieces into strip sets. 
These are sometimes put away in bins (for years!) until I decide on a project. 
Here are seven fabrics that I sewed together randomly. 

Then I used a Kaleido-Ruler to cut triangles. This ruler has easy to read marks that indicate what size setting triangles to cut from what width fabric to match your triangles.

In the photo above the marks to indicate the triangles from strips are on the left and marks for setting triangles from strips on the right

And this is my completed block.


KNITS
On the knitting needles this month is a rose-toned mohair shawl. It is a variation on a pattern that I saw in Free-Spirit Shawls: 20 Eclectic Knits for Every Day by Lisa Shroyer.

The pattern starts with a big cast-on of around 240 stitches. I used a size 9 needle. I modified the lace pattern at the cast-on edge to one of my own liking.

Shaping for the shoulders is done with short-rows and wraps. I plan to use an i-cord bind-off to finish it and when I do I will post more pictures.

I have had the mohair (gift from a friend) for more than 2 years and finally decided to use it!  I only have one skein left.


Saturday, April 25, 2015

In the Studio - Felted Wool Basket How-To

I just completed a knitted felted wool basket using wool leftover from other projects. This project can be made using any size knitting needle and 100% wool. You want this project to shrink when you felt it in the washing machine so do not use super-wash!

Pick a needle several sizes larger than recommended for the weight yarn you are using. I used a worsted weight wool and a size 11 needle.  

Start by knitting a rectangle in garter stitch. Size does not matter. Remember you are playing with scraps!

When you finish the rectangle do not bind off. Instead pick up stitches on the other 3 sides of the rectangle using a circular needle (I used a 24-inch size 11).  Join in the round and just knit! 

Continue knitting. It will naturally look like stockinette stitch because you are knitting in the round only using the knit stitch! This is the beauty of knitting-in-the-round!

As your basket grows decrease a few stitches evenly around (I used several knit-2-together). Continue knitting. 

When you feel that it is tall enough bind off all stitches loosely and weave in the ends.
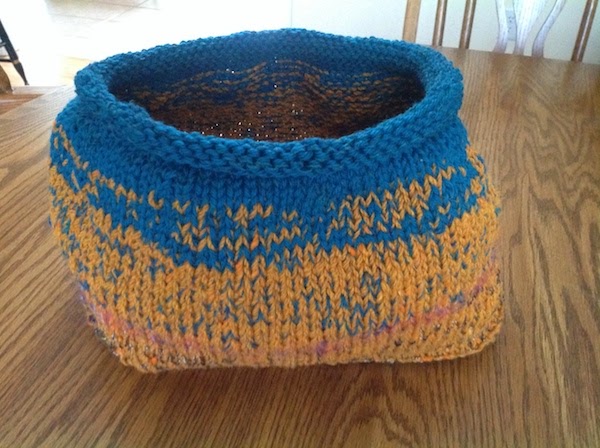
Before Felting
The fun begins when you toss your project in the washing machine with a pair of old jeans, some detergent, and hot water. Wash everything! You may want to put the basket through the wash several times to create a completely felted basket. I usually do 3 runs. Remove your basket and stuff it with plastic bags to help it hold its shape while drying.

Enjoy the process and your basket!


Wednesday, April 22, 2015

Idea Accepted to Quilting Arts Holiday 2015!

I am tickled to have just shipped off my project to Quilting Arts!

I can tell you a little about it but cannot post any photos yet.

The magazine accepted my idea for the 2015 Holiday Gift magazine. The magazine can be pre-ordered online or will be available on newstands later this year.

Here are 5 hints...perhaps you can guess what it is?

  1. It is a quick project.
  2. It uses upcycled or recycled materials.
  3. It is portable.
  4. It is soft.
  5. It is colorful.
  6. It is smaller than a breadbox.
  7. It incorporates a technique I do not often use.
  8. It incorporates materials I really like to use.
  9. It can be made in less than 20 minutes.
  10. You could give this gift to a teacher, friend, colleague, boss, sister, or anyone!

Saturday, February 28, 2015

Party Banner How-To


I created this banner for the engagement party I am hosting next month for my son and his fiancé.

Here is how you can do it:

  1. Print words on plain white paper.
  2. Cut words out and paste on decorative squares.
  3. If desired paste those decorative squares on another paper (thicker is good)
  4. Punch holes in corners 
  5. String letter-cards on string or yarn


Wednesday, February 25, 2015

Art by Routine


We all have routines. We wake up, drink coffee, eat breakfast, brush our teeth, and go to work. Any committed full-time artist will tout the necessity of making art every day, but what about those of us who still work another job?

I need to create art every day, and most days I do.  I definitely think about my art each day and it helps me to make ‘to do lists’. This is the list I made today (while on break at my day job):

Bake cookies for engagement party
Post baby quilt on Etsy
Create banners for party
Lay out 9-Patch quilt; if like then sew one row together
Update blogs


The list helps me orient myself when I get home from work. I am a morning person and I am at a much lower energy level  by mid-afternoon when I return from my day job. 

That said, my list helps me focus on what I want to, or need to, accomplish.  I admit I am lucky to have a spouse who is retired and is an amazing chef.

Sunday, February 15, 2015

Fat Quarter + Ziplock Bag + Dye = Surprises

Last Saturday I had the chance to be a test subject for Carol R. Eaton Designs. Carol will be teaching a hand dyeing workshop at the New Britain Museum of American Art soon and wanted to run through the coursework. Rosalind Spann and I were lucky enough to be guinea pigs. Here are several fat quarters that I made during the afternoon.

Blue and yellow fiber reactive dye on cotton; folded and placed in ziplock bag, left for 24 hrs
Blue and yellow fabric reactive dye on cotton, bunched and placed in ziplock bag with 1/4 cup of soda ash water, left for 24 hrs

Red and yellow fabric reactive dye on cotton, folded and placed in ziplock bag, left for 24 hrs


Red and yellow fabric reactive dye on cotton, bunched and placed in ziplock bag with 1/4 cup of soda ash water, left for 24 hrs

Creative Magic

In her book Big Magic , Elizabeth Gilbert (who is best known as the author of Eat, Pray, Love ) writes "I believe the creative process ...